Bosch IoT Things
A Bosch IoT Insights project can be configured with either a default (shared) or a custom Bosch IoT Things service instance. The project will be connected with a namespace in Bosch IoT Things. That way, you can see and manage your devices stored in Bosch IoT Things under Devices. Data processors create and update devices on incoming data.
You need to have the Admin role to access the Bosch IoT Things settings. This role is automatically provided to the person that executed the project booking.
Proceed as follows
Click the Bosch IoT Things tab.
→ The Bosch IoT Things tab is displayed and shows the configuration page for connecting a Bosch IoT Things service instance.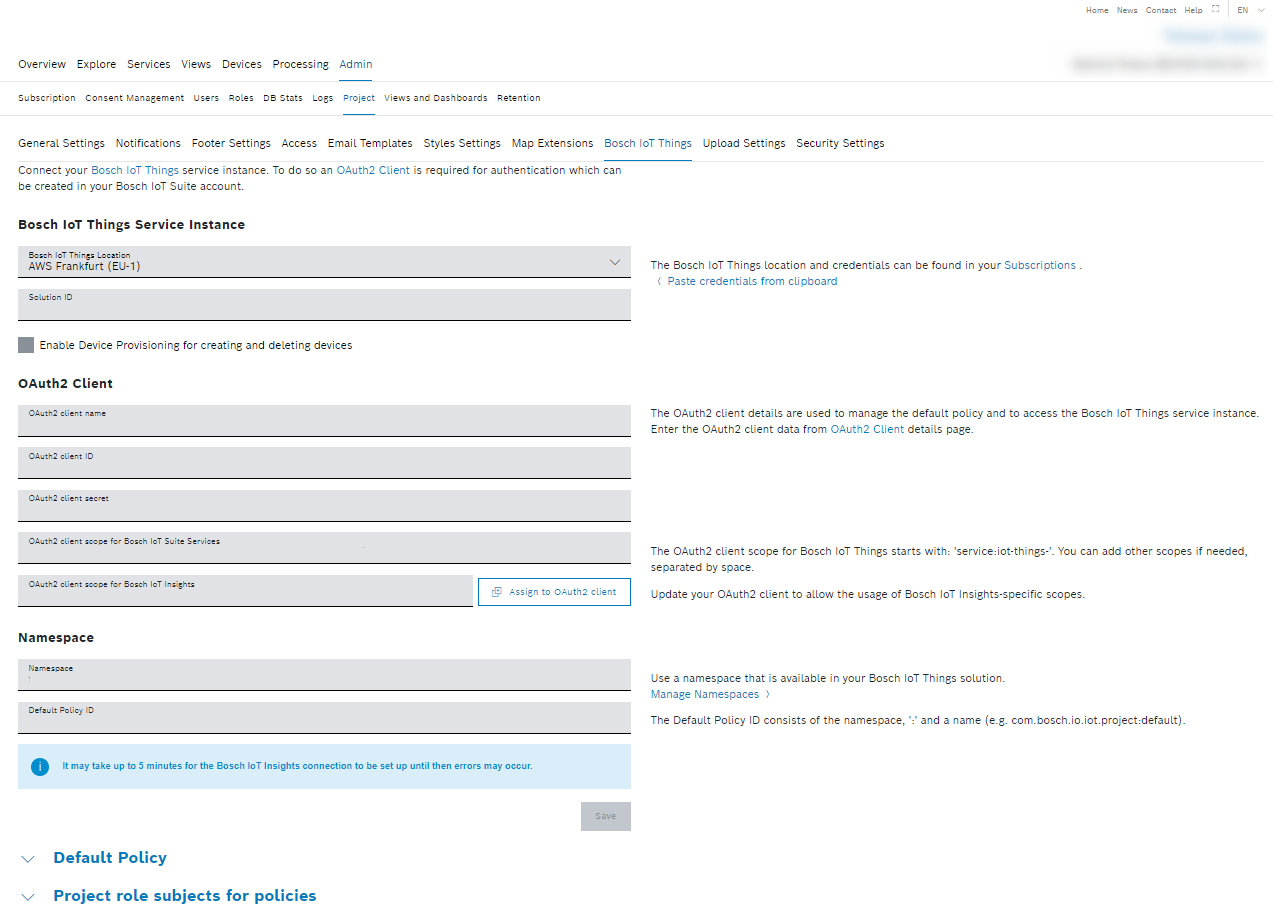
Prerequisites
You have booked a Bosch IoT Things service instance in the Bosch IoT Marketplace.
To execute the following actions, you have to be assigned to the Admin role.
The Admin role is currently only provided to the person that executed the booking. For projects without an admin please open a support request.
Using the default Bosch IoT Things service instance
The default Bosch IoT Things service instance is provided by Bosch IoT Insights for a newly created paid-plan project with only few devices. It has a fixed namespace that is used to store Things for the project.
Free-plan Bosch IoT Insights projects get their own Bosch IoT Things free-plan, which is automatically configured.
The default Bosch IoT Things service instance is only available for paid-plan users.
If your project consists of a large amount of devices, we recommend to use a custom Bosch IoT Things service instance to have full control over the Bosch IoT Things solution.
Configuring a custom Bosch IoT Things service instance
If you have a project with a large amount of devices, it is recommended to configure your own Bosch IoT Things service instance within Bosch IoT Insights.
Paid plan users: After you have configured a custom Bosch IoT Things service instance, you cannot revert to the default Bosch IoT Things service instance.
Proceed as follows
Activate the Custom Bosch IoT Things service instance checkbox to configure your Bosch IoT Things service instance within Bosch IoT Insights.
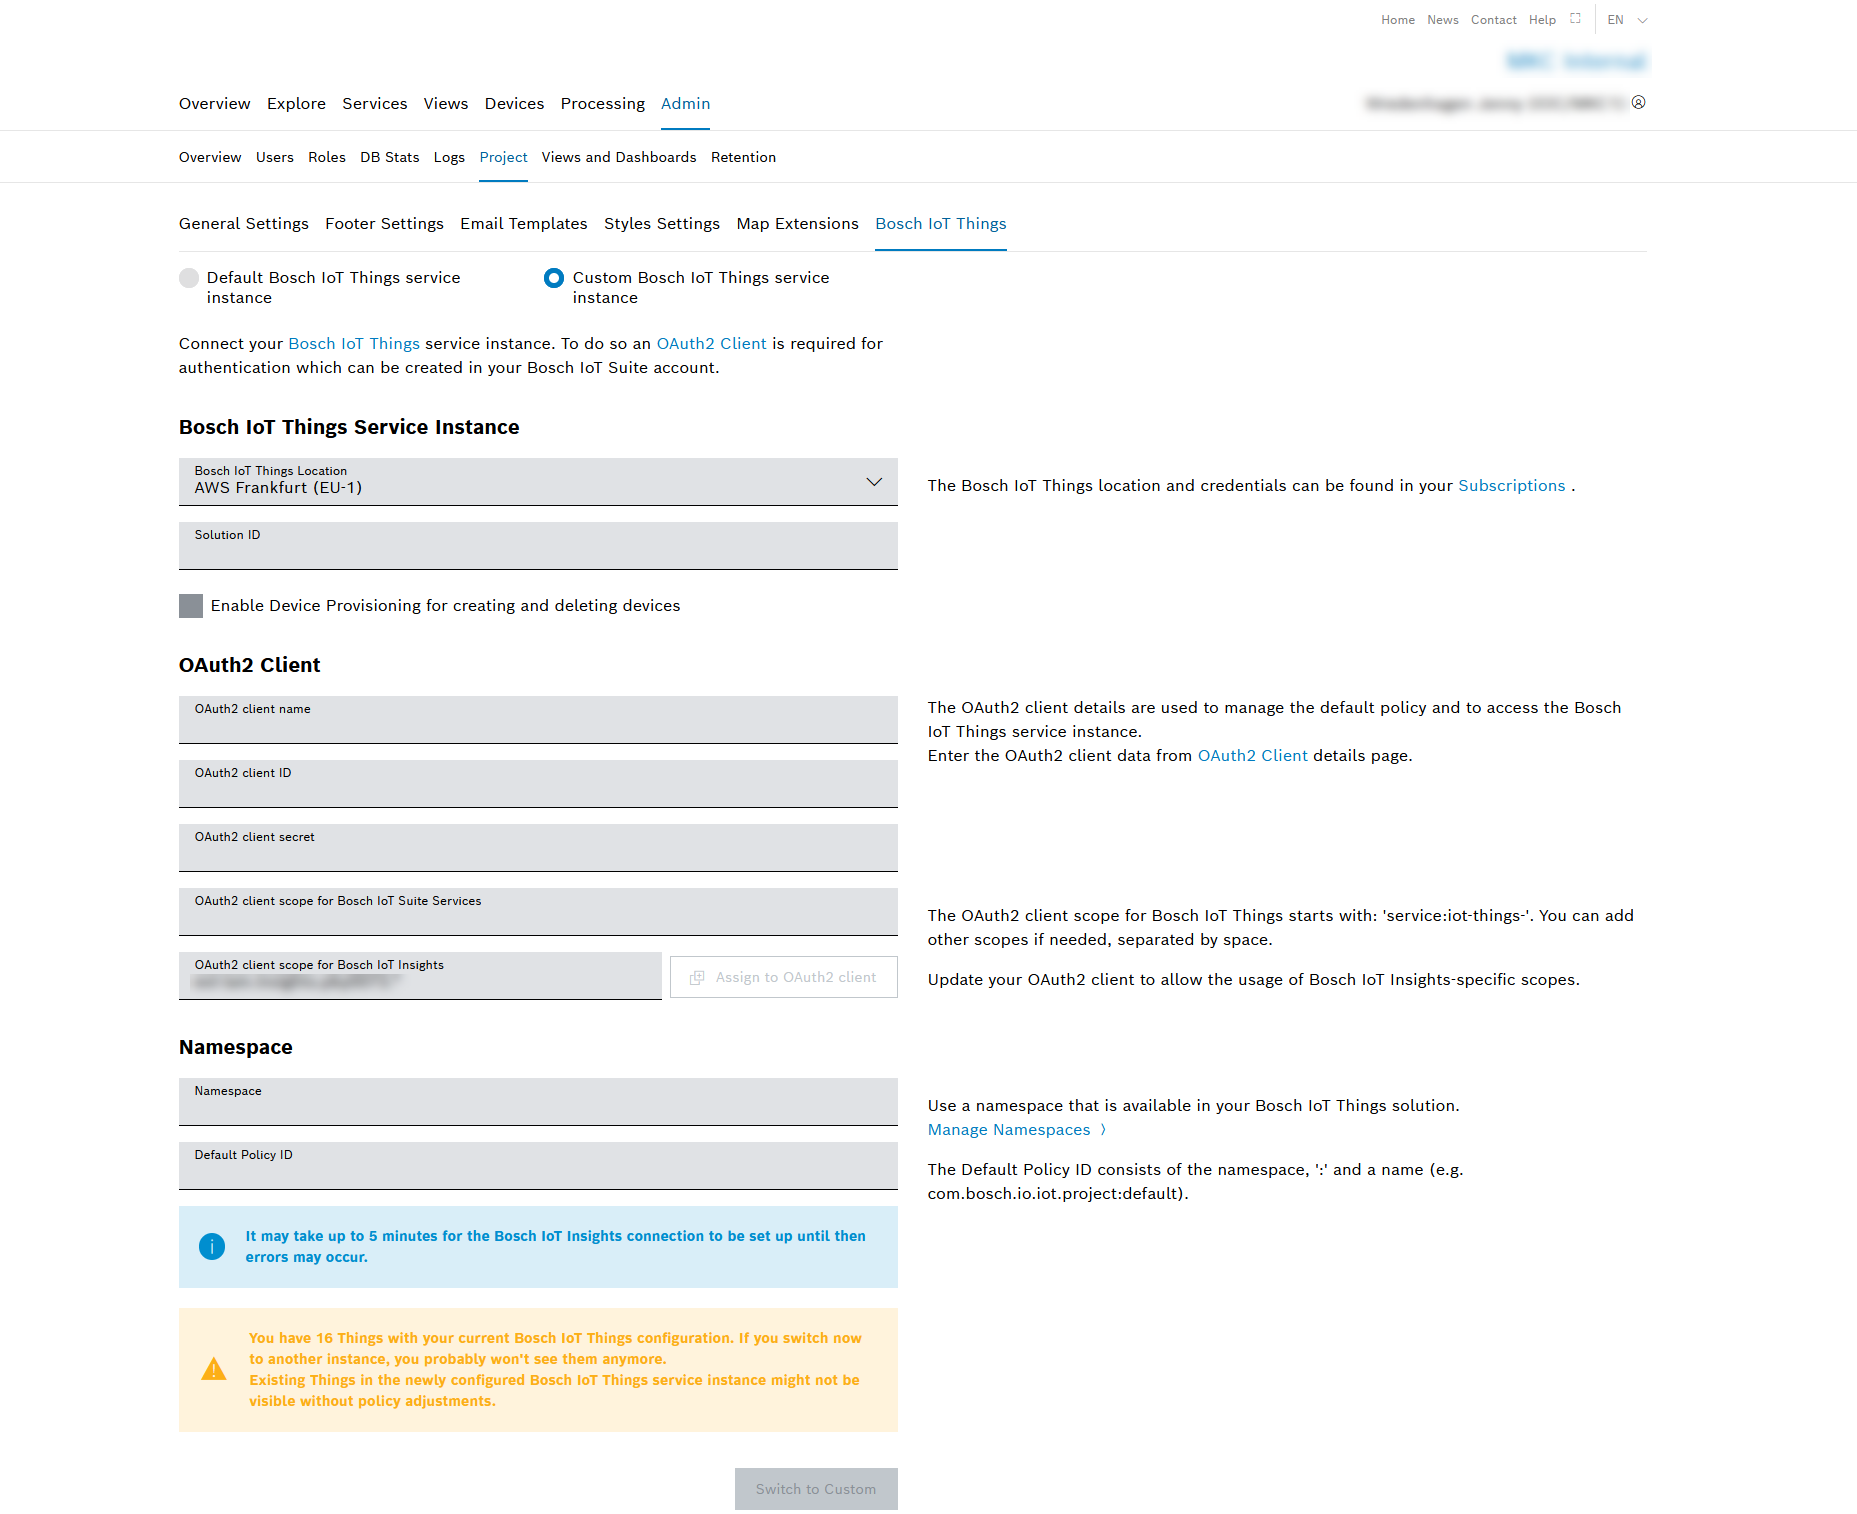
In the Things Service Instance pane, add the following information of your Bosch IoT Suite subscription.
In the Bosch IoT Things Location drop-down list, select the location of your Bosch IoT Things service instance.
If you selected AWS Frankfurt (EU-1) in the Bosch IoT Things Location drop-down list, the checkbox Enable Device Provisioning for creating and deleting devices is displayed.
If you activate the Enable Device Provisioning for creating and deleting devices checkbox, the Device Provisioning API of the Device Management Package will be called when a device is created or deleted. That means that the data is sent to the Device Management Package endpoint.
Changing the Bosch IoT Things Location may delete all your existing devices. Contact the Bosch IoT Insights' support team if you want to proceed with this change.
In the Solution ID field, enter the Solution ID.
In the OAuth2 Client pane, add the following information of your OAuth2 client.
The OAuth2 Client needs the scope of the Bosch IoT Things service instance you just created to access the service instance.
In the OAuth2 client name field, enter the client name of your OAuth2 Client.
In the OAuth2 client ID field, enter the Client ID.
In the OAuth2 client secret field, enter the client secret.
In the OAuth2 client scope for Bosch IoT Suite Services field, enter the client scope of your Bosch IoT Things service instance which starts with service:iot-things.
In the OAuth2 client scope for Bosch IoT Insights field, enter the client scope of your Bosch IoT Insights service instance.
Click the Assign to OAuth2 client button to update the Bosch IoT Insights' scope.
→ The OAuth2 client update page in the Bosch IoT Suite Portal is displayed in a new tab.Click Update to save the Bosch IoT Insights' scope for your OAuth2 client.
Close the tab.
In the Namespace pane, add the following information of the Bosch IoT Things subscription.
When you book a Bosch IoT Things service instance, you receive a solution. Within this solution, you can create namespaces. This has to be done on the IoT Things Dashboard or via the corresponding API. A namespace is required to use Bosch IoT Things with Bosch IoT Insights. Your Things will reside within this namespace. Example: com.example.myns.
Find details in the Bosch IoT Device Management documentation.
See https://docs.bosch-iot-suite.com/device-management/Define-a-default-namespace.htmlIn the Namespace field, enter the namespace which you created in your Bosch IoT Things service instance.
In the Default Policy ID field, enter the Default Policy ID, the namespace, and add :default as Policy ID, e.g. dev.test:default.
Click the Switch to Custom or Save button.
→ The custom Bosch IoT Things service instance has been configured.Wait approximately 5 minutes before reloading the browser and testing the creation of new devices in your namespace using Bosch IoT Insights.
The Bosch IoT Things service instance configuration is cached for up to 5 minutes in different parts of Bosch IoT Insights. So it may take a while before the newly configured service instance can be used. If the cache has not been renewed yet, the Bosch IoT Things configuration page shows the warning The configured instance is currently not in effect. It should take no longer than 5 minutes.Reload the page and check if the warning is gone. When it is gone, the newly configured Bosch IoT Things service instance can be used.
Once the newly configured Bosch IoT Things service instance is in effect, you can browse to Devices > All Devices to see all Things in your namespace that you are allowed to view. If you miss Things, you might not have the necessary permissions to see them, refer to the Configuring the policy of existing Things section on how to get access.
Common errors
Default Policy could not be created: Failed to create policy dev.test:default: Check if the ID of your requested Policy was correct and you have sufficient permissions.
This error can be returned when the policy already exists and the API user is not allowed to access it.
→ Change the Default Policy ID.
Default policy
A policy is a document that defines who (subjects) can do what (resource grants). Refer to the Policy chapter of the Bosch IoT Things documentation for the detailed concept.
Bosch IoT Insights uses a default policy that is copied to newly created Things. Things can be created by Power Users or higher under Devices > All Devices or, if configured, a processor creates Things during data processing.
The default policy must be within your namespace. Bosch IoT Insights will use the provided OAuth client to create the default policy if it does not already exist. If a policy already exists, it will not be touched.
When Bosch IoT Insights creates a default policy, it initially has the following entries:
Manage: defines which subjects can read and write Things, the policy, and messages
The User Role ID of the user who created the policy (usually the API user)
The Power User Role ID which grants permissions to all power users of the project
The SFDE_ADMIN Role ID which grants permissions to the Bosch IoT Insights team
See: defines which subjects can only see Things
The User Role ID which grants read permission to all users of the project
The default policy looks as follows:
{ "policyId": "<your-namespace>:default", "entries": { "see": { "subjects": { "iot-suite:/ext-iam.insights.sfde_things_monitoring": { "type": "iot-insights-role" }, "iot-suite:/ext-iam.insights.<your-project>.user": { "type": "iot-insights-role" }, "integration:your-solution-id_things:insights": { "type": "iot-things-integration" } }, "resources": { "thing:/": { "grant": ["READ"], "revoke": [] } } }, "manage": { "subjects": { "iot-suite:/ext-iam.insights.<your-project>.manager": { "type": "iot-insights-role" }, "iot-suite:/ext-iam.insights.<your-project>.power_user": { "type": "iot-insights-role" }, "iot-suite:/ext-iam.insights.<your-project>.admin": { "type": "iot-insights-role" }, "iot-suite:/ext-iam.insights.sfde_admin": { "type": "iot-insights-role" } }, "resources": { "policy:/": { "grant": ["READ", "WRITE"], "revoke": [] }, "thing:/": { "grant": ["READ", "WRITE"], "revoke": [] }, "message:/": { "grant": ["READ", "WRITE"], "revoke": [] } } } }}Configuring the policy of existing Things
If you cannot see your existing Things under Devices > All Devices in Bosch IoT Insights, you have to configure the policy or policies of the existing Things.
We recommend to use the roles in the Project role subjects for policies pane. These subjects can be used in a policy to grant access for users of Bosch IoT Insights with the named roles. This ensures that all users with, e.g. the Power User role in your Bosch IoT Insights project see the same Things under Devices > All Devices.
Use the IoT Things Policy API to modify the policies of your Things with the provided Bosch IoT Insights subjects.