In Bosch IoT Insights, you can process data according to your own needs using a pipeline. In this tutorial, we will show you how to configure a basic pipeline with a custom step.
This tutorial is based on the example Pipelines: Configuring the custom step. We will use the provided Python code example to configure the custom step.
For more information on data processing and the configuration of pipelines, refer to the following chapters:
Prerequisites
- You need to have a paid plan of Bosch IoT Insights. (The free plan does not include this feature.)
- You are an Admin in your project.
The content of the Configuring a pipeline to process data tutorial is also available as a video here.
This chapter details the following topics:
Modifying the Python code example
As a first step, we will download the Python code example from the Pipelines: Configuring the custom step chapter and modify the step.py file.
Proceed as follows
- Open the Pipelines: Configuring the custom step chapter and download the Python code example.
- Unzip the folder.
- Open the
srcfolder. - Open the
step.pyscript for editing as we will add a random value to our pipeline data. - Add
from random import randrangeto the beginning of the script. - Underneath
# modify the data, replace thefirst_doc['payload']["addedValue"] = "my python invoked and attached new value"line withfirst_doc['payload']["addedRandom"] = randrange(100). - Save the file.
- Zip the folder.
Configuring the pipeline
We will now create a pipeline and upload the modified zip folder to the custom step.
Proceed as follows
- Open the Processing > Pipelines tab.
- Click the Create New Pipeline button.
- In the Pipeline App Name field, enter a name for the pipeline.
- Click the Create New Pipeline button.
→ The App Settings of the pipeline are displayed. - Open the Configuration tab.
- For the Input Trigger, activate the Custom Filter checkbox so that not every document will be processed by this pipeline but only those that have the metadata type
python. - Enter
{ "metaData.type": "python" }as the filter.
Leave the Parser as it is.
You can use the Parser to transform input data into exchange data, which is the internal data format of the pipeline.
To do so, you would choose from parser types like default, ZIP files, JSON, XML, or Vector DBC. The default parser type is always a good choice as it parses all formats.- Click the plus icon and add a Custom step.
- Click the Edit icon
 to add a name for the custom step.
 - Drag and drop the modified zip folder into the upload box.
→ The zip folder is added to the custom step.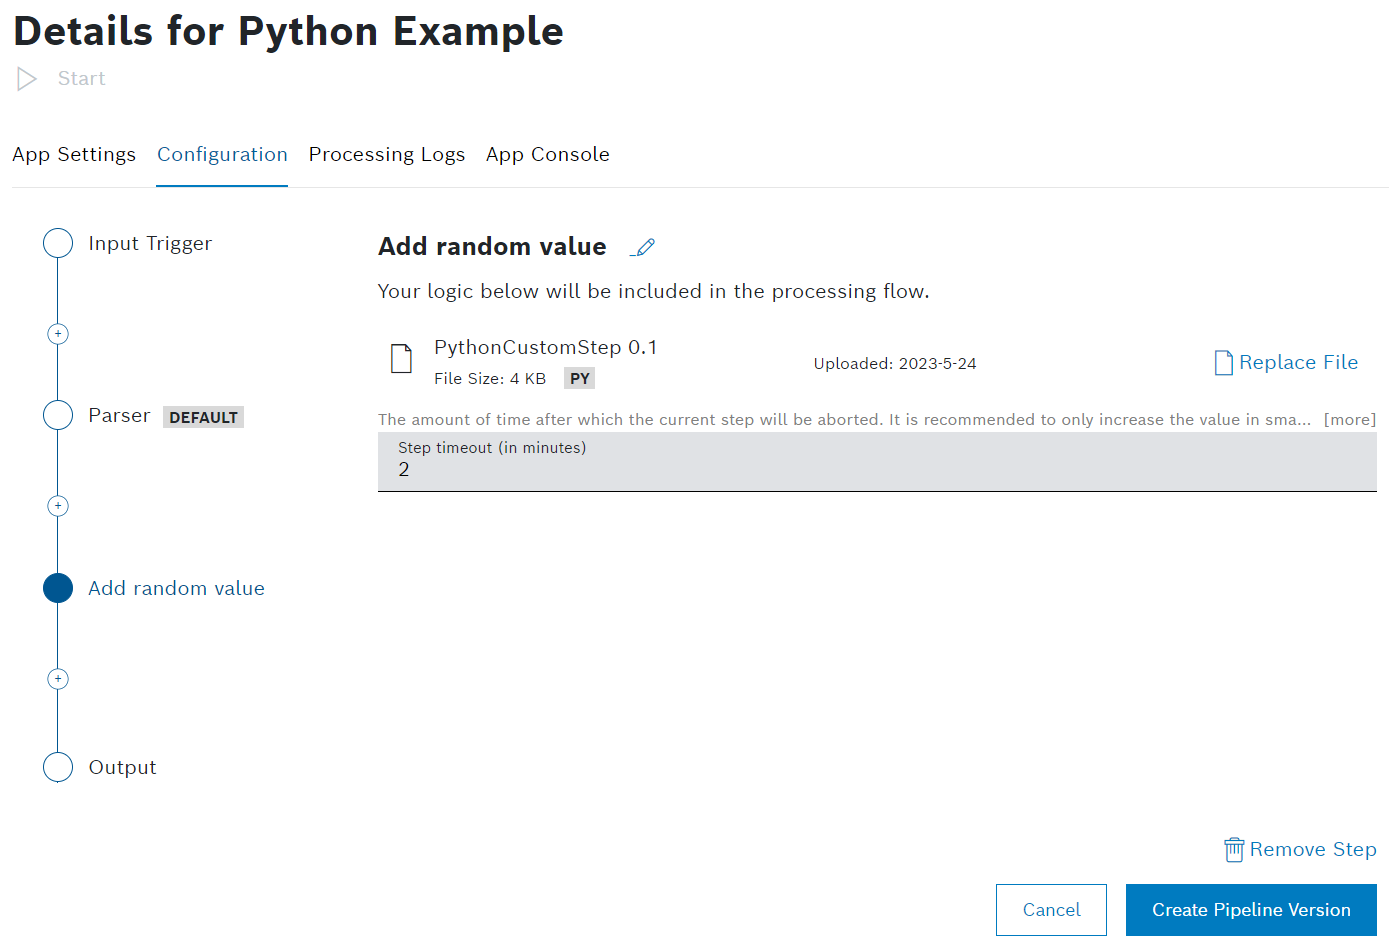
- Open the Output step.
- Next to the Output Collection drop-down list, click the New Collection button.
→ The Create New Collection dialog is displayed.- In the Technical Name field, enter a technical name for the collection.
- In the Label field, enter a label that will be displayed.
- Click the Create button.
→ The new collection is created.
Click the Save button to create the pipeline.
This may take a few seconds.
→ The pipeline has been configured.
Click the Start button to start the pipeline.
This may take a few seconds.
→ The pipeline is started and can be used to process data.
Uploading a document for processing
For processing data, we will create a simple JSON file and upload it to Bosch IoT Insights.
Proceed as follows
- Open Notepad++ or any other tool.
- Enter
{"Hello": "Python"}. - Save the document.
- Open Processing > Data Upload.
- Click the Select Files button to upload the file we just created.
- Select the file.
→ The file is added. - Click the + Metadata button to add the python type.
- In the Key field, enter
type. - In the Value field, enter
python.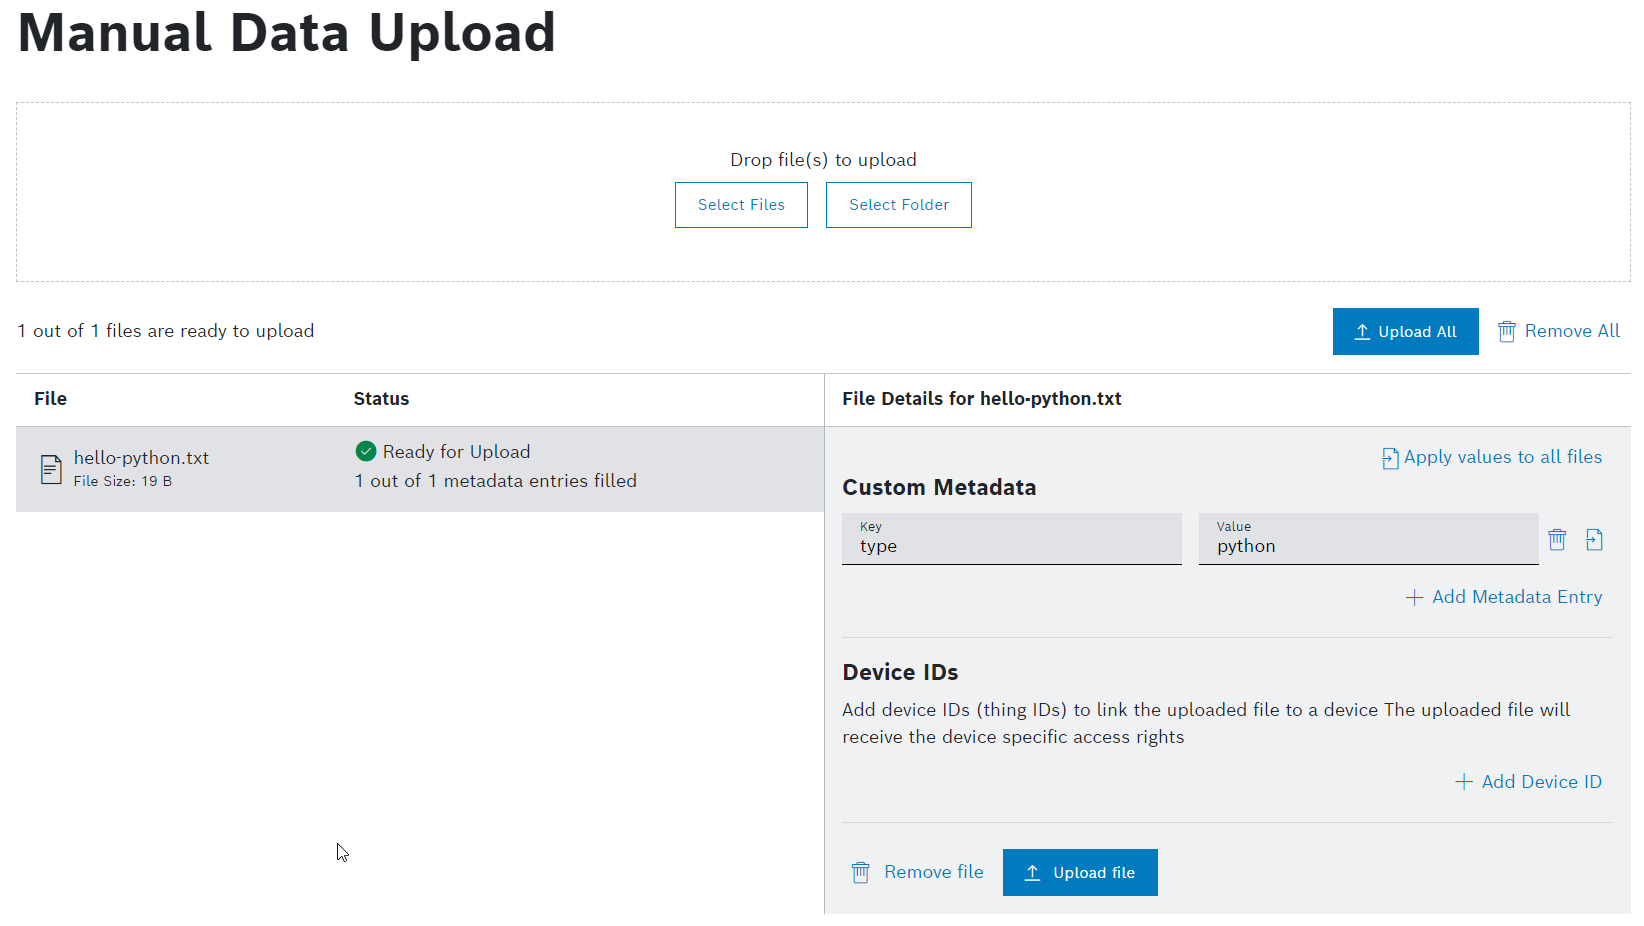
- In the Key field, enter
- Click the Upload button to upload the file.
→ The file is processed.
Viewing the processed data
After the data was processed, you can see the result in the Data Browser.
Proceed as follows
Click the View Processed Data button to be redirected to the Data Browser.
→ The processed document with the random value is displayed.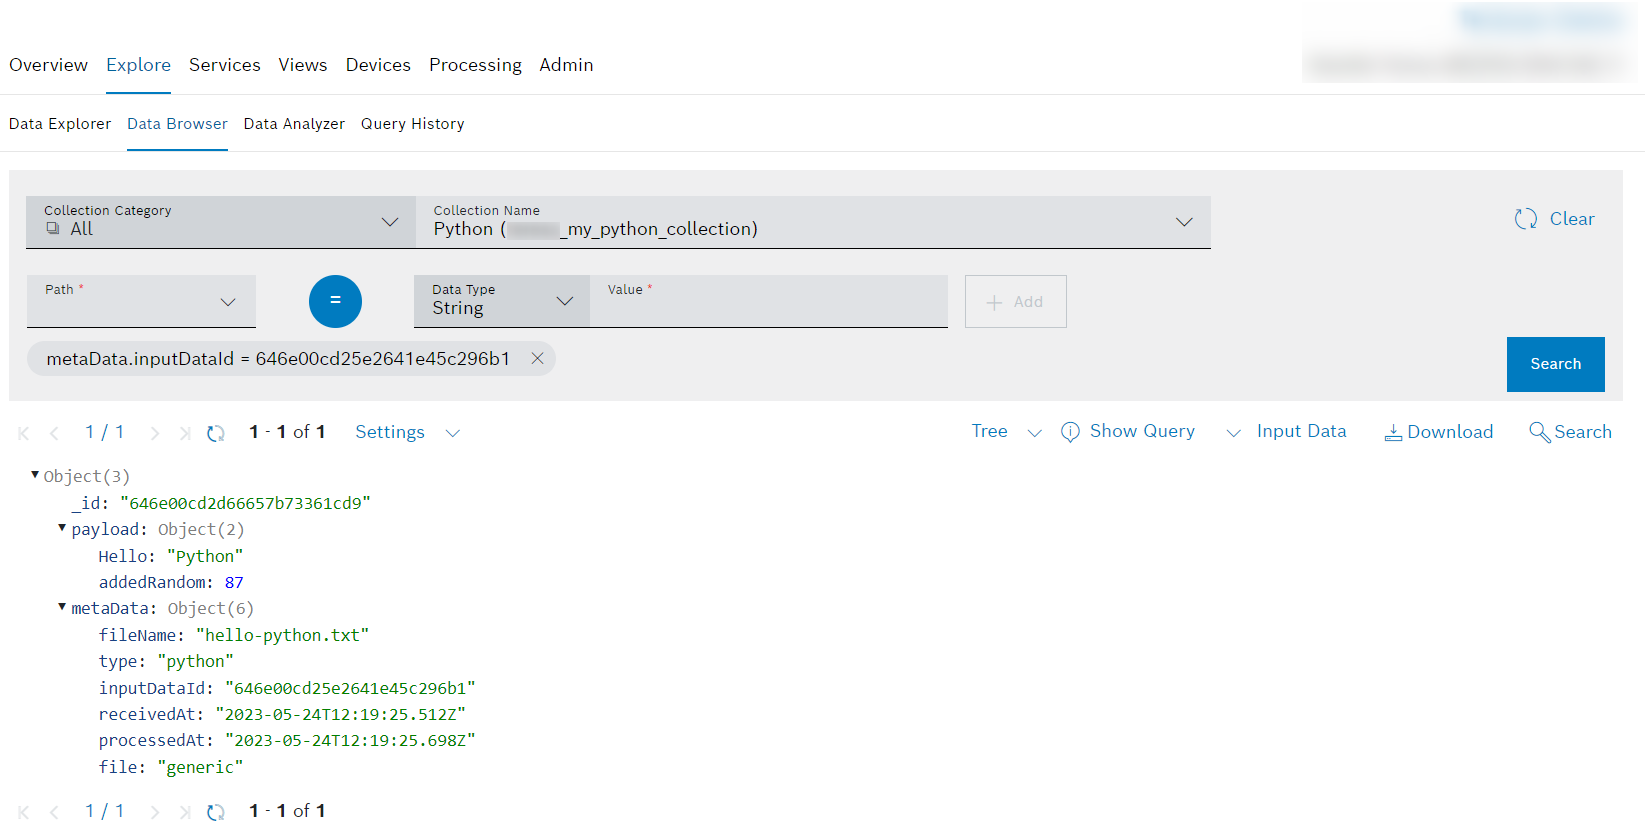
If the random value is not displayed in the processed document, we recommend to either disable the default pipeline or configure the custom filter in the input trigger of the default pipeline to not process data of the type
python. In case you uploaded the document before, you could also delete/purge the corresponding input history and processing information entries.- Open the tab with the new output collection we created while configuring the pipeline.
→ The processed data and also the random value is displayed.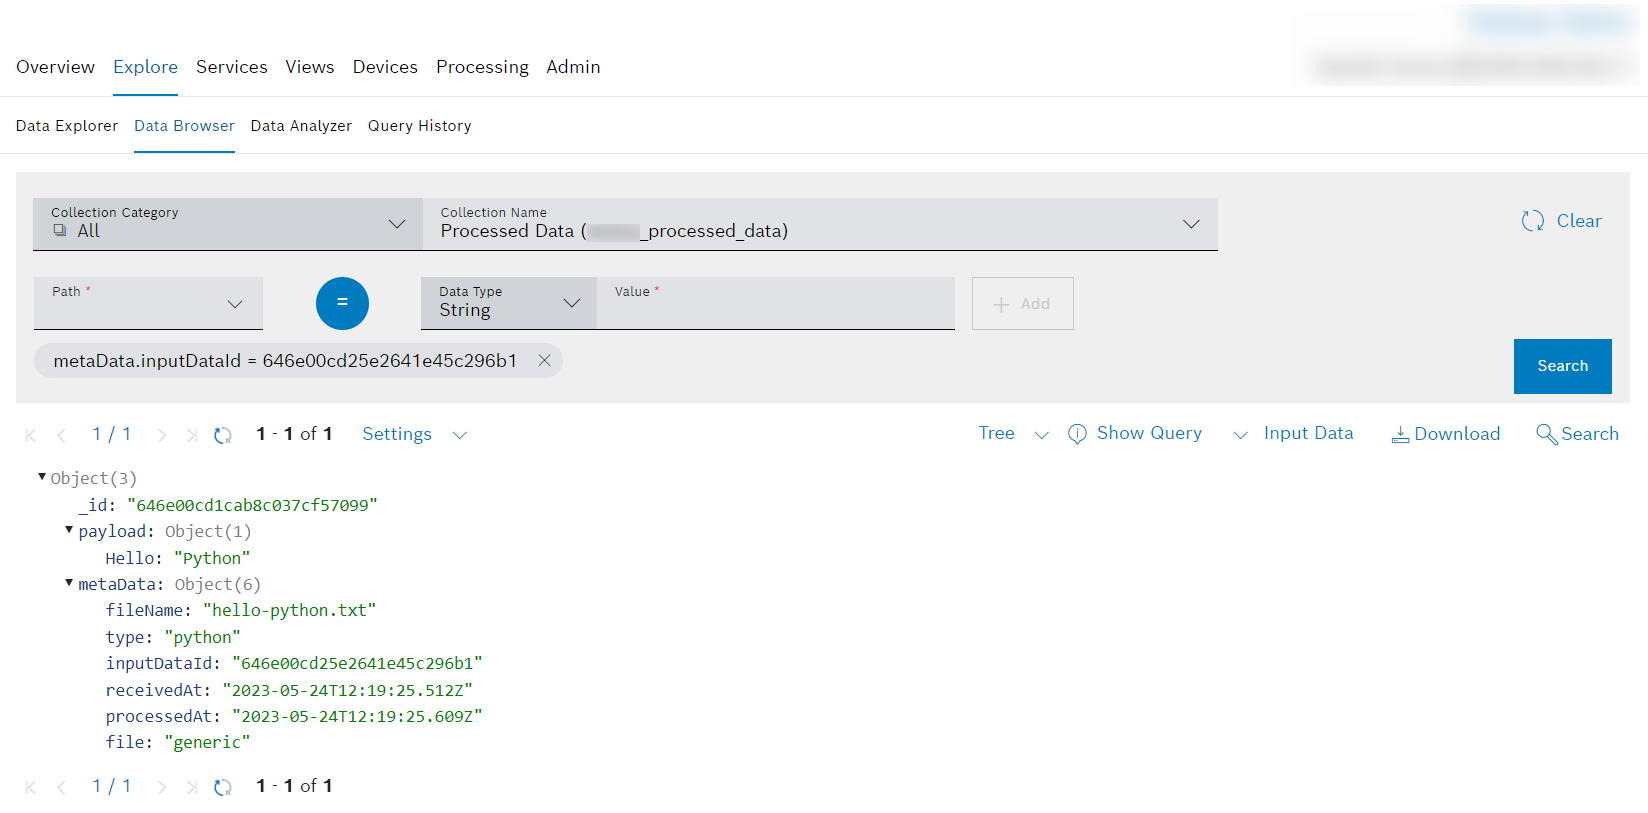
- Open the Processed Data tab to find out how the data was processed with the default pipeline.
→ The processed data is displayed without the random value.